Welcome
Welcome to our knowledge hub!
Everything written here is designed to help you set up the best referral program for your business and provides you with:
Contact
If you have any questions while reading through this information please contact:
Account team for all marketing related questions:
account@membergetmember.co
The development team for all IT related questions:
tech@membergetmember.co
Our operations and customer support team for all other questions:
info@membergetmember.co
Glossary
We use a lot of terms that might be confusing at first, so we created this list to help you get familiar.
| Category | Term | Explanation |
|---|---|---|
| User | Promoter/seller | A participant in your referral campaign that recommends your brand to his/her friends. |
| Referral/buyer | A friend that’s invited to become your new customer through the recommendation of his/her promoter. | |
| Sharing | Share/Sharing | A recommendation/the action of recommending your business, done by the promoter. |
| Sharing widget | A small ‘plug-in’ to embed on your Sharing Page containing all the share functionalities of your referral campaign. | |
| Sharing Page | A dedicated page where your Sharing Widget is embedded and promoters can participate in the referral campaign to recommend you to his/her friends. | |
| Share message | The recommendation sent by the promoter from within the Sharing widget. | |
| Reward | The incentive for the Promoter for recommending you, and for the Referral for becoming a new customer. | |
| Share tools | The buttons in the Sharing Widget that enable sharing the personal link via email, WhatsApp, Facebook or directly. | |
| Personal/Referral link | Each promoter gets a unique link to send to his/her friends, which will lead to the Personal Page of the promoter. | |
| Personal page | A page where the Referral can land when visiting the Personal link - displays the promoter’s name, a quick explanation of your product, the reward and a CTA button to your website | |
| Referral | Referral Landing Page | A dedicated landing page on your website for Referrals to land. This will act as a starting point for your online sales funnel. |
| Soft Landing Widget | A widget that can be implemented on the Referral Landing Page to give the Referral a warm welcome by displaying the Promoter’s name and the reward. | |
| Sales | Sales | When a Referral completes your (online) sales funnel and becomes your new customer through the referral campaign. |
| Sales tracking | A mechanism that establishes a connection from your system to ours that lets us know whenever a sale happened. This can be done in the frontend using ping.js or in the backend with an API connection. | |
| Callback | A signal when a Referral completes your sales funnel that sends back all his/her details to our system to tie him/her to the right Promoter. | |
| Sales matching/validation | The process of verifying the Referral became a valid new customer (only when there’s a cancellation period). | |
| Initialized sale | When a Referral is sent to your Referral Landing page, we register this as a initialized sale (also known as ‘click out’) - doesn’t apply to voucher projects. | |
| Confirmed sale | When the Referral becomes a new customer through your online sales funnel, a confirmed sale will be administrated in our system to let us know the sale happened - Only when a cooling off period is set. | |
| Completed sale | When we have the verification the Referral is a valid new customer and thus the rewards can be paid out, the sale state changes to ‘completed’. This can be instantly after the sale happened or after the cooling off period when you do the sales matching. | |
| Aborted Sale | If the Referral or Promoter somehow did not comply to the terms and conditions of the referral campaign, you can reject them so the Reward will not be paid. | |
| Cooling off period | The time between the Referral buying your product and you validating he became a new customer (i.e. didn’t cancel or was rejected). | |
| Ping.js | A small piece of Javascript to implement on your sales funnel’s confirmation (or thank you) page and to send us buyer information to confirm the sale. | |
| Event mails | Our email flow that will automatically send an email when: a new promoter signs up, a sale is confirmed, completed or aborted, when a reward is paid. |
User flow
The Member Get Member principle aims at turning your happy customers into active brand ambassadors by providing you with the tools to easily set up your own referral campaign.
The image of the user flow below gives a quick overview of how your referral campaign will work:
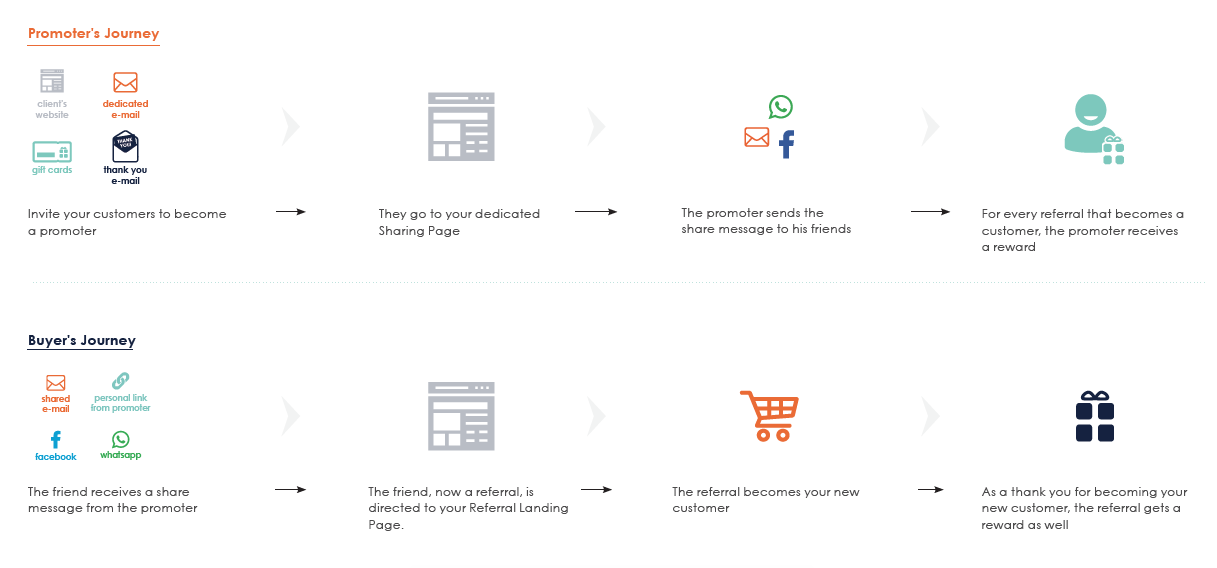
- You invite your existing customers to become a Promoter by integrating your referral campaign on as many (relevant) touch points of their customer journey possible.
- You lead them to your dedicated Sharing Page where your Sharing Widget is embedded.
- They register as a new promoter and use one of the Share Tools to recommend your brand to their friends.
- Their friend (now a Referral) receives a share message containing the personal link.
- The personal link either redirects them directly to the Referral Landing Page on your website, or to the personal page of the Promoter.
- The Referral completes your sales funnel and is now a new customer!
- Both the Promoter and the Referral will get a reward.
Security & Compliance
Clients may want to know about our security arrangements. Here is some information on how the API and database are secured.
Philosophy
Our security is built around the idea of scoping - the idea that security credentials should be limited to only the access the user has been specifically approved for and has requested.
This makes our system paranoid by nature, not making any information accessible to any user that is not trusted.
API, database and tokens
Our “database as a service” provider is Mlab. In terms of their security arrangements, they have a document here that describes the security arrangements on their side.
Mlab uses Amazon Web Services (AWS) data centres in Dublin, Ireland as their server farm. AWS is one of the biggest hosts in the world and their security reputation is unblemished.
Documentation in their security policies (including physical access) is available on their “Cloud Compliance” section.
Of the security measures available via Mlab, we implement auth mode and SSL connectivity. The web management portal is only accessible via authentication through the Heroku portal and as such is not open to log-ins from external parties.
Only authorized employees have access to any privileged information such as sales and user data. This access level can be revoked instantly to any account at any time, making it very easy to handle any kind of unlikely compromised credential issue.
Our application is structured with a central RESTful API, and the white label solution we provide is essentially a front-end client that runs using the API as its data store and processor.
The API represents the only access to the database available.
As for our authentication and authorization strategy, each user has a set of permissions, and almost all users (excluding the specially designated administrator accounts for our staff) have basic access to limited portions of data that is publicly available (such as information on a company’s product like logo image, description, price, etc), as well as the relevant data they may own (such as access to edit their own offers).
This permission level is present in each user object, and ensures that a user’s request to our API will only return data they have access to.
Sales data, payment information and data on other users is strictly locked off from all but the administrator permission levels.
The “bearer token” scheme is a common pattern used in applications such as ours - the specification is here.
When a user authenticates (through signing in via Facebook or email/password), they are given one of these bearer tokens. The token is a unique cryptographically encoded string with an expiry time. These strings are decoded on each request that is sent to our API, and the user is looked up using this token. The user’s permission level is checked, therefore, on each request.
Any request with a token that is not encoded using our cryptographic signature, is expired or in any way invalid will entitle the requestor nothing but a 401 (unauthorized) error.
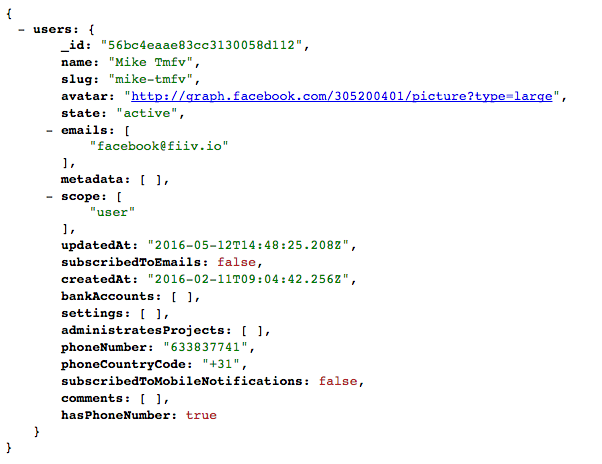
Any given user can only access their own email address, IBAN, sales data and we store no other information on the user. It is not possible for a user to (maliciously or otherwise) look up any of this sensitive information on another user, as ownership of the data is checked on each an every request.
Demonstration
Here is a request being made for a user without any authorization credentials:
Here is a request being made for a user when authenticated as the user:
Cookies
Cookies (or other storage methods such as local storage) can be classified into two categories - 1st party (MGMCo’s) and 3rd party (vendor’s).
Our 1st party stores are only used to identify the user when interacting with our platform such as in their dashboard after they have logged in and to remember the current sale when they have begun the process.
3rd party stores are used on our platform for some of our vendor-provided tools, such as Chatlio which provides an on-site chat element for support.
We do not sell or share information with any other parties.
The less information we collect, the less information we need to protect.
Intro
We’re thrilled you want to start your own Referral Campaign! Before we get to the technical part, let’s start with setting up the foundation:
Set your Targets
What do you want to get out of your referral campaign?
By setting targets beforehand, you can optimize and alter your campaign along the way. Don’t just think about the amount of sales you would like to bring in, but also set a target for the number of active promoters your referral campaign should gain and most importantly, how.
We recommend you to analyze your customer base, and (optionally) divide them into groups. Dividing them in groups will allow you later on to specify your message about your Referral Campaign, according to what motivates them to join and become a promoter. In the end, you know your customers the best and what works for them.
Campaign Name
Come up with a great name for your referral campaign. This way you create consistency and recognition to easily communicate your campaign to your (potential) promoters.
The most common examples:
- [Your brand] Vriendenvoordeel
- [Your brand] Vriendenkorting
- [Your brand] Voor Vrienden
- [Your brand] Friends
- [Your brand] Tell a Friend
- [Your brand] Refer a Friend
We recommend a name that’s catchy, easy to remember, clear as it is and fits your tone of voice.
Rewards
You probably want to offer a sweet deal to the referral and thank the promoter for bringing in a new customer. Our software works with double-sided rewards to incentivize both the promoter and the referral. What type of reward you want to give out, is entirely up to you. But of course there are some reward types that work better than others depending on your product or service:
Cashback
For a product or service that’s based on a contract or subscription and when it’s unlikely a repeat purchase will be done in the next 12 months, it makes the most sense to reward with a cashback. When the referral sale is approved, the reward (money) will be transferred to the bank account of the promoter and/or the referral.
Voucher code
For (online) stores or products where the chances are high customers will come back to purchase again, it’s more profitable to offer a discount code. This can be a discount for a certain percentage off, a certain amount or even a freebie with their order. Referrals can fill in the code shared by their promoter for their first-time purchase for instant discount. The promoter will then be rewarded with a code for their next order. This is also a great way to stimulate repeat purchases.
Manual
You know your business best. If you’d rather have another type of reward that suits your customers better than a cashback or a discount code, there’s the manual reward option. For example, you can give out a third party voucher or even some kind of activity. If you have an altruistic brand and target group, you can even choose to donate (a part of) the reward to a good cause.
Hybrid
You can set the reward for the promoter and referral individually, so it’s totally possible to combine the types of rewards for your referral campaign. For example, you can give your promoter a cashback whenever the referral used their voucher code for an instant discount on their first-time order. For each type of reward, you decide what the amount or perks will be.
Tip: make sure the reward is in proportion with your average purchase amount and the referral ‘deal’ should at least match the best current deal on your website.
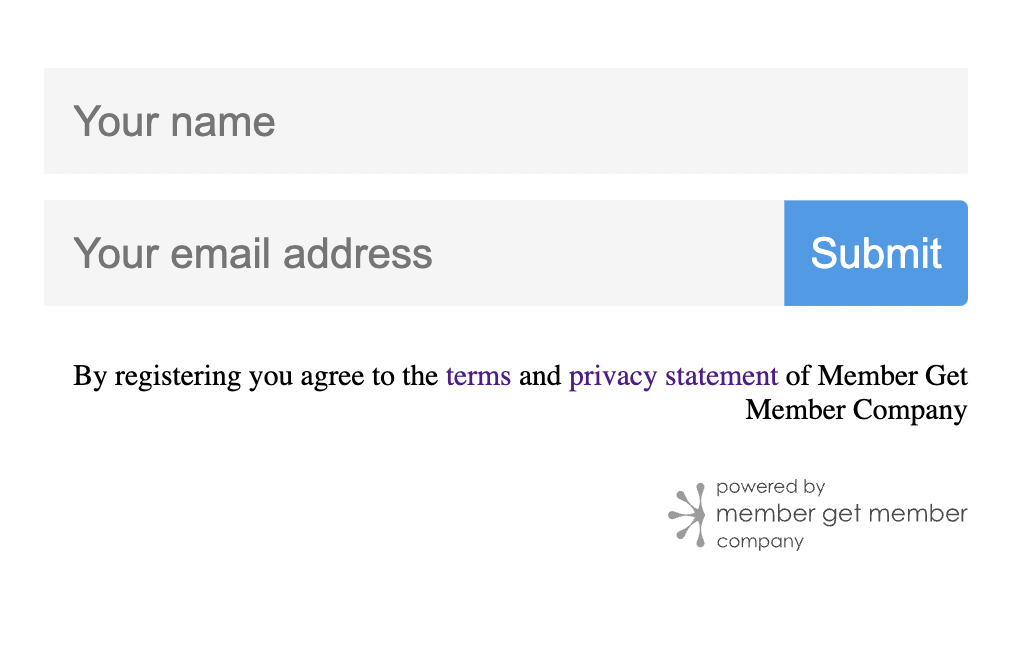
Sharing Page
You set your targets, gave your campaign a name and figured out what kind of reward you want to give out. Now the real work starts: integrating the Sharing Widget. The Sharing Widget is the core of your Referral Campaign and contains all the share functionality to enable your customers to be your brand promoters.
You have the total freedom to just embed the widget on any random (or every) page on your website, but from experience we can tell you that that doesn’t quite work. That’s why we recommend creating a great-looking stand-alone page (= Sharing Page) where the Sharing Widget will be embedded. Preferably use an URL that’s easy and obvious, like yoursite.com/vriendenvoordeel. Since not everyone is known with the concept of referral programs, having a page with just the Sharing Widget isn’t enough.
A good Sharing Page contains at least the following elements:
-
A catchy slogan: for example, ‘Refer a friend and get €20!’
-
A brief description of your Referral Campaign: explain briefly why you offer this to your customers.
-
The reward for the promoter and his referral: the reward should be clearly visible, so the Promoter can instantly see what’s in it for him and his friends.
-
How the campaign works: preferably as short as possible and visualised (in 3 steps) describing broadly the campaign (1. Share with your friends, 2. Friend buys through your link, 3. Reward!).
-
What the promoter needs to do: again, explain as short as possible how the promoter can share (1. Fill in your name and email, 2. Share through email, WhatsApp, Facebook or copy and share your personal link, 3. Friend becomes customer? Reward!)
Do’s
- Embed the widget on a coloured background or even an image (then we recommend to use a white background)
- Make the widget the hero of the page
- Place it above the fold
- Make it fun!
Don’ts
- Using a white or light background. The widget will not be noticable enough.
- Embedding the widget below the fold.
- Overwhelming amounts of text. Don’t assume your potential promoters will read it all. In most cases they will feel discouraged and give up.
In other words: don’t hide the widget! Someone that’s willing to promote you to their friends, shouldn’t spend much effort doing this.
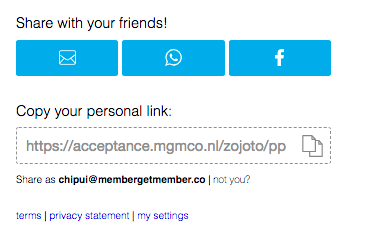
Sharing Widget
What is the Sharing Widget?
Now you have set a great-looking Sharing Page, it’s time to embed the widget. With a small snippet of Javascript you can have a fully functional member get member platform embedded on your own website, completely in your look and feel. With this functionality you enable your existing customers to share the love for your brand and products with their friends. They simply share their personal referral link (or code) with one of the Sharing tools provided in the Sharing Widget: email, WhatsApp (web & app) or Facebook.
The setup is extremely easy, and once complete, it operates automatically. The Sharing Widget has some minimal CSS styling, but for the most part will take on the look and feel of your website. However, you are free to customize the widget by overwriting the CSS.
What is required for implementation?
This is done via a very simple piece of code (see below).
The Embed Code
The code itself is very simple. With no customized properties, it looks like this:
<div id="mgmco-widget"></div>
<script src="https://embedded.membergetmember.co/app.js"></script>
<script>
  MGMCo.init({
    // Get this from your friendly MGMCo dev or operations person
    project: "your-identifier",

    // This part controls where on the page the application will be mounted
    selector: "#mgmco-widget",
  });
</script>
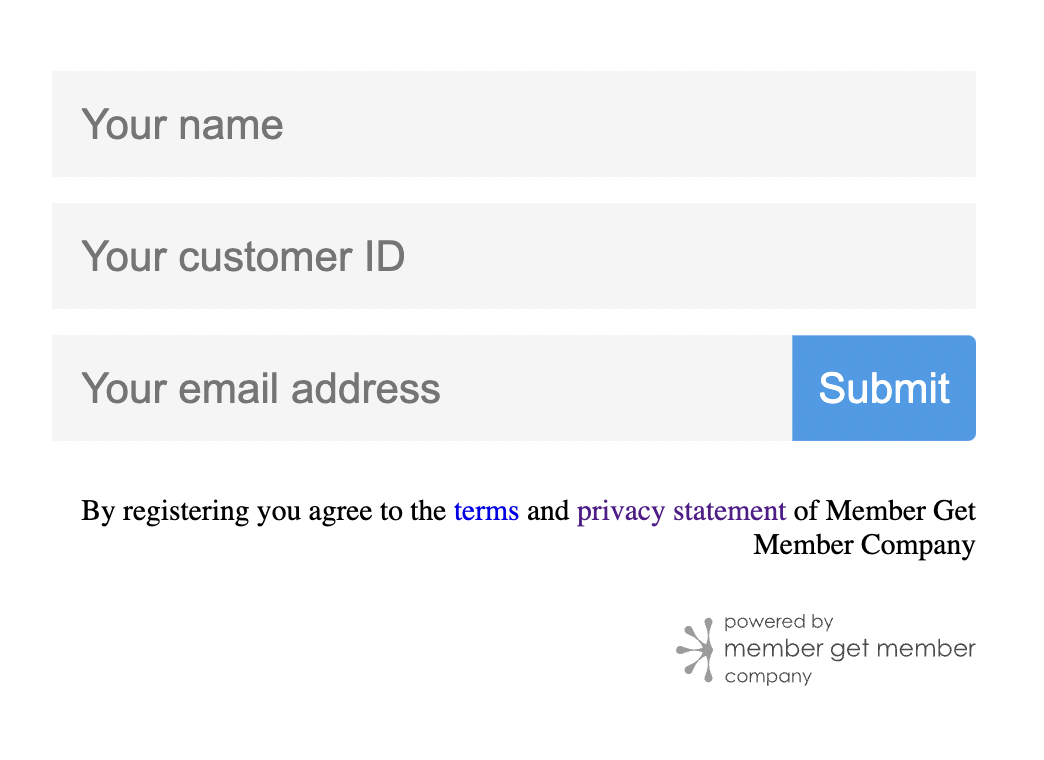
The end result should look like this:
Before promoter registers
After promoter registers
Signup Fields
Besides the default name and email fields, you can choose to add extra signup fields to the login panel. For example, you can ask the user to enter their customer ID:
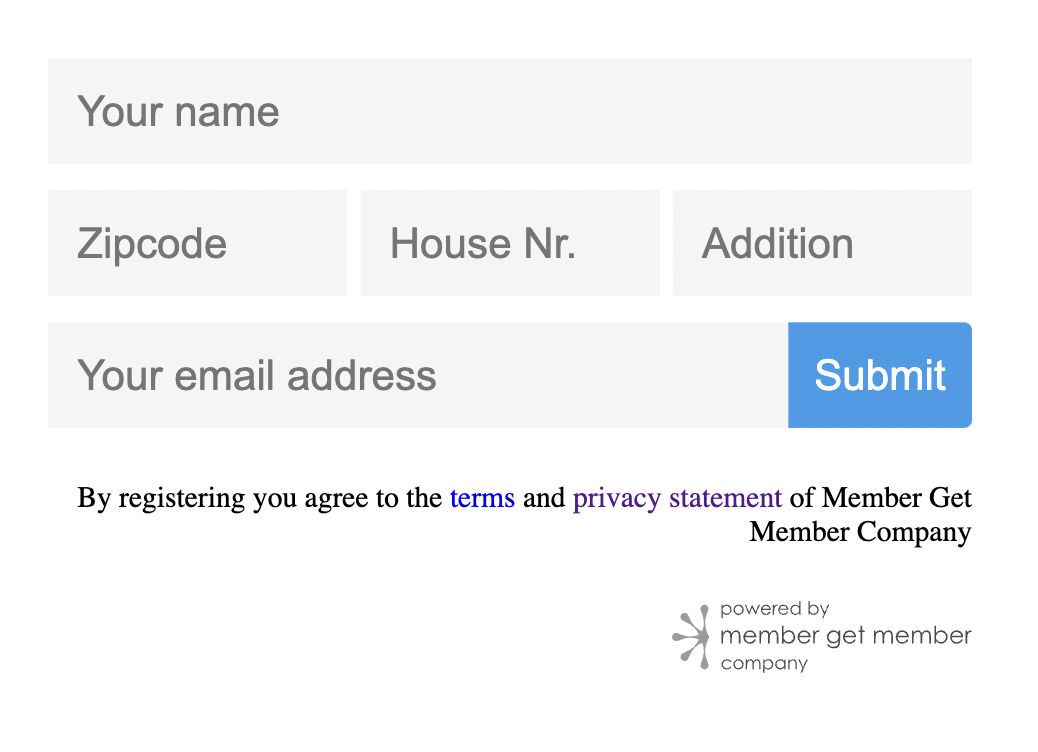
or maybe their zipcode and housenumber, like so:
Contact your onboarder and they will add this for you.
You can use this data to determine if a user is eligable for participating with your referral program. You can do this manually in the Campaign Manager when you are validating sales (you will find the signup data in the user info panel). Or you can include these fields in a sales export and automate the validation process on your side.
Another option is to use our webhooks! A webhook will send an api call to your backend with all the signup fields, and you can determine if this user is allowed to register or not.
Referral Landing Page
Cool, you’ve set up your Sharing page and your promoter can now share their love for your brand with their friends. But.. where will those friends go? To a great-looking dedicated landing page on your website, of course!
Just like with the Sharing page, we recommend you include at least some basic elements:
-
A warm welcome to your Referral program
-
The reward
-
A quick explanation how and why the Referral got here
-
Your USP’s
-
Soft Landing Script (optional, but recommended)
-
Referral Landing Widget (in case of single use vouchers)
-
CTA to shop!
Soft Landing Script
In the redirect url of the personal referral link to your Referral Landing Page we automatically send along the promoter name as a param. The Soft Landing Script ensures you can use this param to display the name of the promoter and the reward on a nice welcoming message. Implementation increases your sales conversion and potential buyers will no longer be worried about their reward.
How does it work?
- We will append all required information to the
URLwhen users clicks out from a personal page - A script needs to be embedded on the Referral Landing Page, which is the start of your sales funnel
- The script reads out the information from the
URLand creates a beautiful banner!
Customization
The script has 5 variables that may be customized:
| Variable | Description |
|---|---|
parentElement |
The HTML-element to which you want to bind the widget. Navigation bars usually work nice for this. |
primaryColor |
The color used for headers on your website |
secondaryColor |
The color used for normal text on your website |
introText |
The caption of the widget |
extraText |
The extra information (about the reward) that you’d to give to the potential buyer |
The script
(function() {
function protectXSSInjection(decodedUri) {
return decodedUri
.replace(/</g, "<")
.replace(/>/g, ">")
.replace(/%3C/g, "<")
.replace(/%3E/g, ">");
}
function decodeURISafely(encodedUri) {
var decoded = decodeURIComponent(encodedUri)
return protectXSSInjection(decoded)
}
// custom definition per project
var parentElement = document.querySelector('section .container');
var uri = decodeURISafely(window.location.href);
// if the script is executed twice, we will display the widget only once
if (parentElement.querySelector('.mgmco-promotor-widget')) return;
function getUrlParam(name) {
name = name.replace(/[\[]/,"\\\[").replace(/[\]]/,"\\\]");
var regexS = "[\\?&]"+name+"=([^&#]*)";
var regex = new RegExp(regexS);
var results = regex.exec(uri);
return results == null ? null : results[1];
}
function capitalizeFirstLetter(string) {
return string.charAt(0).toUpperCase() + string.slice(1);
}
// get url parameters
var promotorWidget = getUrlParam('promotor_widget') === 'true';
var name = getUrlParam('promotor_name');
var buyerReward = getUrlParam('buyer_reward');
if (!promotorWidget) return;
name = (name ? capitalizeFirstLetter(name) : 'jouw vriend');
// custom definition per project (fill in yourself)
var introText = 'Hi there, ' + name + ' made you an offer.\n';
var extraText = 'You can share a ' + buyerReward + ' reward';
var primaryColor = '#2E86C1';
var secondaryColor = '#27AE60';
// build html/css (also customisable)
var widgetHTML =
'<style>@media (max-width: 480px) { .mgmco-promotor-widget-div h3 { font-size: 22px !important; line-height: 22px !important; }}</style>' +
'<div class="mgmco-promotor-widget-div col col-md-12" style="text-align: center; color:'+ primaryColor +';">' +
'<h3 style="font-size: 42px; line-height: 44px;"><span style="color: '+ secondaryColor +';">' + introText + '</span><br>' + extraText + '</h3>' +
'</div>';
var widget = document.createElement('div');
widget.setAttribute('class', 'row mgmco-promotor-widget');
widget.innerHTML = widgetHTML;
// prepend html/css to the innerHTML of the defined parent element
return parentElement.insertBefore(widget, parentElement.firstChild);
})();
Testing
Go to the url of your Referral Landing Page where the script is installed and add these parameters, like so:
https://test-website.com/refer?promotor_name=Pietje&buyer_reward=10&promotor_widget=true
You should be able to see your welcome message with the name ‘Pietje’ on your page!
Referral Landing Widget
To prevent misusage of your Referral program’s voucher/discount codes, we’ve built a new feature. We call it the Referral Landing Widget.
How it works
The promoter shares his personal link with his friends. When his friend, now Referral, clicks the link and lands on your Referral Landing page, he will see the Referral Landing Widget. To claim his code, he needs to fill in his name and email. Our system then does a few checks:
- Is the Referral email the same as the promoter email? He won’t get a voucher code.
- Did the Referral claim his code before, but hasn’t used it yet? We’ll show him the code he previously claimed so he can use it now.
- Did the Referral claim his code before and also used it for his purchase? In this case, he won’t get a new voucher code either.
If the Referral passes all these checks, his personal voucher code will be shown with a CTA button that redirects to your shop.
Implementation
The implementation is basically the same as the Sharing widget: you need a page and a small piece of JavaScript.
The code
<div id="mgmco-referral-landing"></div>
<script src="https://embedded.membergetmember.co/app.js"></script>
<script>
MGMCo.referral.init({
  // Get this from your friendly MGMCo dev or operations person. Same one as in the Sharing widget
  project: 'your-identifier',

  // This part controls where on the page the application will be mounted
  selector: '#mgmco-referral-landing',

  // the page to where the buyer will be redirected after claiming a voucher code.
  // The path will have a voucher_code param with the voucher code. For extra user friendliness, you could prefill this at checkout.
  salesFunnelUri: 'your-sales-funnel-uri',

  // remove this line for production
  environment: 'acceptance'
});
</script>
Signup Fields
Like the Sharing Widget, the Referral Landing Widget also supports signup fields.
Getting started
Are you running a voucher project? Click here!
Whenever a referral finalizes a sale on your website we’d like to be informed. This process, known as sales tracking, serves 3 purposes:
- We need to identify the referral.
- We need a way to connect that particular referral to the right promoter.
- We need to communicate with both parties to pay out the reward.
Our sales tracking is based on callbacks: a signal from your system to ours to inform us the state of the sale has changed. We differentiate between two types of callbacks:
a. Sale confirmation
This first callback lets us know that the referred friend became a customer through your online sales funnel. This is needed to link the referral to the right promoter and inform all involved parties. We match the Referral to the promoter based on the mgmco_saleid. Each promoter has a unique referral link that will redirect the Referral to the start of your salesfunnel (also called Referral Landing Page). In that redirect our system creates a mgmco_saleid that is linked to the promoter (referral link). When the Referral successfully becomes a customer, the mgmco_saleid is sent back in the callback with all of the needed Referral information.
b. Sale validation
To make sure those referrals are actual customers and have not canceled or violated the terms of service, there needs to be a sale validation after the cancellation period (usually 14 days). The validation is meant to inform us whether the sale has been approved (completed) and can be paid out, or rejected (aborted).
You might have an existing system that does the validation and automate the callback for you (ask your developers!). If not, we have the CSV importer as a solution that lets you import a list with your approved and rejected sales. Ask our operations team for details about the process.
If you don’t have a cancellation period, you can skip this second validation and change the ‘state’ to completed right away.
Implementation
Stage 1: Acceptance (test) environment
Before we go live, we’d encourage you to test the callback on a demo environment so it will not impact any real sales.
What does your developer need to do?
- We pass the
mgmco_saleidto your platform via a param in the URL - Your frontend needs to store this MGMco sale ID as a Cookie with a lifetime of 30 days (How?)
- When the buyer completes your sales funnel, a callback needs to happen by passing on the buyer info and the
mgmco_saleidinto theMGMbuyerInfoobject in our ping.js script. - Your frontend should pass the MGMco sale ID to your API to save it along with the sale (optional; see Sale Validation)
- Your API could make a 2nd callback to complete a sale once we are allowed to pay out (optional; see Sale validation)
Ping.js script
Implementation ping.js
We maintain a small, easy to use piece of Javascript called ping.js that does all the work of tracking sales for you. To implement it, you need to include the code on your sales funnel’s confirmation (or thank you) page and send us some basic buyer information.
- Load the script on the correct page
- Fill the MGMbuyerInfo object with the correct payload*
- Call the
window.mgmcoPing.send(MGMcoBuyerInfo)function
*The callback should always include the MGMco sale ID, the buyer’s email, name, and bank account.
This is our script for your test environment, which is not linked to our live system. If you were to use this script on your live website, the callback will fail and sales will not be registered.
<script src="https://tracking.mgmco-acceptance.nl/scripts/ping.js"></script>
<script>
  (function() {
    var MGMcoBuyerInfo = {
     // Required fields
      email: 'client@email.com',
      name: 'Name of your new client',
      bank_account: 'Bank account of your new client', // We need this on the operational side for payments

     // for Starter and Pro pricing plan only: total order value on which we'll base our commission
      amount: 'total order amount',

     // One of the following is required, not both
      sale_id: 'MGMco sale id',
      cookie_name: 'Name of your cookie with the MGMco sale id',

     // Required fields
      state: 'confirmed',

    // Insert other parameters if needed
      customer_id: 'Customer ID of your new client', // Handy for failed sale matches
      order_id: 'Order ID of the new order' // Handy for failed sale matches
    };
    window.mgmcoPing.send(MGMcoBuyerInfo);
  })();
</script>
Testing
Now you have implemented the tracking script on your demo environment, you of course want to know if it works. Here’s how to walk through the flow like a referral would do:
- Create a promoter account within the referral program to generate your personal share link.
- Go to the link to visit the promoter page like a referral would, and click the big CTA button that leads to a landing page that is the start of your online sales funnel.
- Open your browser’s dev tools (right mouse click > ‘Inspect’) and check if the MGMco sale id is stored in the cookies.
- Walk through the funnel until you reach the thank you page. Under ‘Network’ tab, search for ‘ping.js’ and ‘callback’. The callback should send a request to
https://membergetmember.co/sales/...containing all the required buyer info. - You should also receive a promoter and buyer confirmation email from our system to inform you about the referral/reward.
Production
Stage 2: Production environment
When the callback on your test environment is successful, you can start implementing the same logic into your real/live website.
The only thing you need do is changing the test version of the script into the script for the live environment by replacing mgmco-acceptance.nl into membergetmember.co:
<script src="https://tracking.membergetmember.co/scripts/ping.js"></script>
The rest of the implementation is the same. So when you’re done, please walk through the entire referral flow again to see if the callback works on your live website as well.
Getting Started
Are you running a cash reward project? Click here!
Whenever a referral finalizes a sale on your website we’d like to be informed. This process, known as sales tracking, serves 3 purposes:
- We need to identify the referral.
- We need a way to connect that particular referral to the right promoter.
- We need to communicate with the promoter to pay out the reward.
Sales tracking improves the customer experience and enables you to convert your newly referred customers into promoters as well, amplifying the reach of your campaign!
There are 2 types of vouchers:
-
Referral voucher:
a. Single Use Voucher: the promoter shares a referral link that leads to your Landing page. A unique voucher code will be provided once the referral fills in his name and email.
b. Multiple Use Voucher: Each promoter receives a personal voucher code after registering to share with his friends. These codes may be used by an unlimited number of new first-time clients.
-
Promoter voucher: One-time use voucher as a promoter reward.
Implementation
Implementation of the voucher reward tracking requires you to:
- Have the ability to redeem vouchers on your website
- Provide MGMco with one set of referral vouchers
- Provide MGMco with one set of promoter reward vouchers or implement the [Referral Landing Widget]
Stage 1: Acceptance (test) environment
Before we go live, we’d encourage you to test the callback on a demo environment so it will not impact any real sales. Therefore, we need two sets of test voucher codes that also exist in your test environment.
What does your developer need to do?
- Provide us with two sets of vouchers
-
Store the voucher code from the referral link in a Cookie with a lifetime of 30 days* (How?)
a. Single Use Vouchers
When a referral clicks the referral link, he/she will be redirected to your Landing Page where the Landing Widget is implemented. Once the name and email of the referral are filled in, a unique voucher code and a MGMco sale id are generated. You can either let the referral copy the code before continuing, or prefill this for them by passing the voucher code in the URL to your online sales funnel.
b. Multiple Use Vouchers
A promoter can either share the referral link or his personal voucher code. When the referral clicks the referral link, we will redirect him/her to your online sale funnel with the voucher code in the URL. This allows you to prefill the voucher code for a friendly buyer experience. If this is not possible, we’d recommend to show the code somewhere on the Landing Page in case the referral did not copy the voucher code.
- When a Referral redeems his voucher code, we need a callback from your system using our ping.js script
*Example redirect URL: https://test.yoururlexample.com/page?voucher=XXXXX
Ping.js script
Implement the ping.js script
We maintain a small, easy to use piece of Javascript called ping.js that abstracts all the work of tracking from your plate. To implement it, you simply need to include the code on your sales funnel’s confirmation (or thank you) page and send us some basic buyer information.
- Load the script on the correct page
- Fill the MGMbuyerInfo object with the correct payload*
- Call the
window.mgmcoPing.voucher(MGMcoBuyerInfo);function
Please keep in mind that the script is only to be triggered when it’s a MGM/Referral sale, and that it should only be fired once. It’s possible your developer has to set some conditions to ensure this.
*The callback should always include the voucher code, the Referral’s email and name
This is our script for your test environment, which is not linked to our live system. If you were to use this script on your live website, the callback will fail and sales will not be registered.
<script src="https://tracking.mgmco-acceptance.nl/scripts/ping.js"></script>
<script>
  (function() {
  var MGMcoBuyerInfo = {
    email: 'your_client@email.com',
    voucher: 'voucher-code',
    name: 'Name of your new client',
  // total order value on which we'll base our commission
    amount: 'total order amount',
  // optional information you can later use for analysis
    order_id: 'your order_id'
  };
  window.mgmcoPing.voucher(MGMcoBuyerInfo);
})();
</script>
Testing
Now you have implemented the tracking script on your demo environment, you of course want to know if it works. Here’s how to walk through the flow like a referral would do:
Referral Flow 1
- Create a promoter account within the referral program to generate your personal share link or voucher code.
- Go to the link to visit the promoter page like a referral would, and click the big CTA button that leads to a landing page that is the start of your online sales funnel.
- If you use Single use vouchers for the Referral, fill in your information in the Referral Landing Widget to retreive your voucher code.
- Pick a product, paste your voucher code at check out and continue until you reach the thank you page. Under ‘Network’ tab, search for ‘ping.js’ and ‘callback’. The callback should send a request to
https://api.mgmco-acceptance.nl/sales/...containing all the required buyer info. - You should also receive a promoter and buyer confirmation email from our system to inform you about the referral/reward.
Referral Flow 2
When the promoter has a Multiple use voucher, he can share his voucher code directly. Hence it is important to test if the callback also works when a Referral goes to your website directly to redeem his voucher.
- Create a promoter account within the referral program to generate your personal voucher code.
- Copy the voucher code
- Go to your website (best in incognito or delete your cookies first)
- Pick a product, paste your voucher code at check out and continue until you reach the thank you page. Under ‘Network’ tab, search for ‘ping.js’ and ‘callback’. The callback should send a request to
https://api.mgmco-acceptance.nl/sales/...containing all the required buyer info. - You should also receive a promoter and buyer confirmation email from our system to inform you about the referral/reward.
Production
Stage 2: Production environment
When the callback on your test environment is successful, you can start implementing the same logic into your real/live website.
The real voucher code sets can be provided to MGMco in an excel file (in one column), in a text file (new line separated) or a CSV. We will import the voucher codes into our system.
Now change the test version of the script for into the script for the live environment by replacing mgmco-acceptance.nl into membergetmember.co:
<script src="https://tracking.membergetmember.co/scripts/ping.js"></script>
The rest of the script/implementation works the same. Now walk through the Referral flows again to make sure your script works on your actual website as well.
Tracking Overview
There are 2 occasions where you may have to make a callback to our API:
In order to know which sales are awaiting validation, there is also an in-between step: sales retrieval.
Here we will give a summary of all the possible steps needed to bring a sale from checkout to finalization.
A. Sale Confirmation
The first callback tells us that the sale has confirmed. You have 2 options in making the first callback:
- Load our tracking script on the sale confirmation (or thank you) page and call a function from the script with the required payload (described below). Read more…
- Make a callback from your API to ours. Read more…
The choice is yours. With the first option you will not have to touch your API. With the 2nd option you may automate validation and save data from your MGM program along with the sale.
B. Sale Retrieval
There are several ways to find sales that need to be validated:
- Sales can be exported manually from the MGmco database by using the sales-export tool in the Campaign Manager. Read more…
- Retrieve the sales from the MGMco database via the
sales-to-validateendpoint from mgmco api. Read more… - Keep track of mgmco sales in your own data store, and retrieve them from there.
C. Sale Validation
The second callback tells us whether the sale has been completed or aborted. After this callback we inform the user that they will be paid (or why she won’t be paid) and soon after we will transfer their reward.
- Approve or reject sales individually in the Campaign Managers Sales table.
- Validate the sales on your end, and produce a csv file that can be processed by the Campaign Managers sales-import tool. Read more…
- Use the
validate-saleendpoint on the mgmco api. Read more…
examples
The three steps above can be used in any combination. Here are some examples:
1. least dev work, but manual sales validation
A1 - B1 - C1
2. most dev work, but full automation
A2 - B2 - C3
API
This is an overview of the available api endpoints that you can use to automate the sales tracking.
Ask your onboarder for an api key. This key is needed for all api calls.
Confirm Sale
This endpoint can be called after a referral makes a purchase on your website. It is an alternative to implementing the ping script.
cash
| method | POST |
| hostname | api.membergetmember.co |
| path | /confirm-sale |
| headers | { “content-type”: “application/json” } |
| body | see Payload |
voucher
| method | POST |
| hostname | api.membergetmember.co |
| path | /confirm-sale/voucher |
| headers | { “content-type”: “application/json” } |
| body | see Payload |
Retrieve Sales
Use this endpoint to fetch all sales that were confirmed in a given time period, and not yet validated.
| method | POST |
| hostname | api.membergetmember.co |
| path | /sales-to-validate |
| headers | { “content-type”: “application/json” } |
| body | { api_key: ‘API_KEY’, start: ‘START_DATE’, end: ‘END_DATE’ } |
The expected date format is yyyy-mm-dd, e.g.: 2022-05-11
Validate Sale
For approving or rejecting a sale.
| method | POST |
| hostname | api.membergetmember.co |
| path | /validate-sale |
| headers | { “content-type”: “application/json” } |
| body | { api_key: ‘API_KEY’, sale_id: ‘SALE_ID’, state: ‘STATE’, reason: ‘Rejection reason’ } |
The state field can only be completed or aborted.
The reason field is required in case the sale is aborted.
Webhooks
Webhooks provide a way for you to validate a user registration. When a promoter registers with the Sharing Widget, or a referral registers with the Referral Widget (in case you are using Single Use Vouchers), a registration call is made from the widget to the mgmco api. If you have an active webhook, the mgmco api will make an http-request with the user login details to your backend, before the registration is finalized. This way you can check the login details against your own Data Store and decide whether the registration can proceed or not.
Webhook Request
For each registration type (promoter or referral) you can provide MGMco with a url to your backend that will handle the user validation on your side. The mgmco api will make a http-request to this URL, where the method will be POST, and the body will contain the login details. The login details will always contain the default key-values ‘name’ and ‘email’, and any additional Signup Fields key-values that you may have configured (see Signup Fields).
Webhook Response
After your backend has received the request, and you have validated the login details, you can send the response in two ways:
-
if you want the registration to proceed: { proceed: true }
-
if you don’t want the registration to proceed: { proceed: false, message: ‘A message explaining why the user was not allowed to register’ }
In the first case the mgmco api will register the user as normal. In the second case the registration will be aborted and the webhook message will be sent back to the widget to inform the user why the registration could not take place.
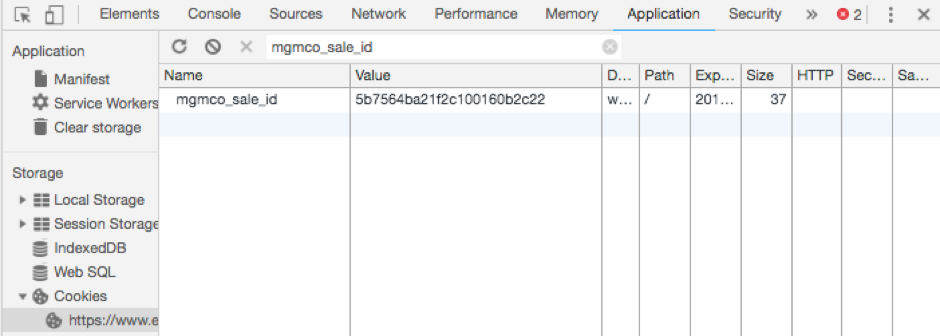
Cookie
On the landing page of your platform the MGMco sale ID should be retrieved from the URL and stored in a Cookie. Cookies are by default set with an expiration time of 30 days.
See the JavaScript or PHP snippet for an example of how to do this.
Make sure that the GET parameter is not stripped from the URL. It should be available on the thank you page after checkout.
/** CODE SNIPPET FOR LANDING PAGE **/
// Retrieve the MGMco sale ID from the URL and store as a Cookie
var urlSaleParameter = 'mgmco_saleid' // default: 'mgmco_saleid'
var expiryDays = 30 // default: 30
var saleId = (location.search.split(urlSaleParameter + '=')[1]||'').split('&')[0];
if (saleId) {
  var expiryDate = new Date();
  expiryDate.setDate(expiryDate.getDate() + expiryDays);
  document.cookie = "mgmco_saleid=" + saleId + "; expires=" + expiryDate + ";";
}

/** CODE SNIPPET FOR THANK YOU PAGE **/
// Retrieve the MGMco sale ID from the URL + check your Cookie
var urlSaleParameter = 'mgmco_saleid' // default: 'mgmco_saleid'
var saleId = (location.search.split(urlSaleParameter + '=')[1]||'').split('&')[0] ||
  (document.cookie.split(urlSaleParameter + '=')[1]||'').split(';')[0];
if (saleId) {
  // This sale ID should be posted to your API to use in the callback
}
// CODE SNIPPET FOR LANDING PAGE
<?php

setcookie("mgmco_saleid", $_GET['mgmco_saleid'], time() +2592000);

// To retreive the MGMco Sale Id and fill it in the MGMbuyerInfo object:
sale_id: '<?php echo $_COOKIE["mgmco_saleid"];?>',
Environments
We have 2 environments running that are completely separated. Acceptance is for testing, before deploying to Production (live).
| Environment | API | Frontend |
|---|---|---|
| Acceptance | https://api.mgmco-acceptance.nl |
{{client_name}}.mgmco-acceptance.nl |
| Production | https://api.membergetmember.co |
{{subdomain}}.{{client_domain}}.nl |
The same goes for our ping.js-script and our widgets.
| Environment | ping.js | Widgets |
|---|---|---|
| Acceptance | https://tracking.mgmco-acceptance.nl/scripts/ping.js |
https://embedded.membergetmember.co |
| Production | https://tracking.membergetmember.co/scripts/ping.js |
https://embedded.membergetmember.co |
In the sharing widget simply remove the line environment: acceptance for using it on the production environment
We strongly recommend to fully test your sales callback integration with our acceptance environment before switching to production (How to test for cash projects and voucher projects).
CNAME
The Settings page, Rewards overview page and the Personal promoter pages (PP) are standalone pages that run on our side. We need to create a separate domain so it’s clear the pages are part of the referral campaign, for example vriendenvoordeel.[client].com.
Now, we can do this for you by creating a subdomain on one of our own standard domains:
promotieprogramma.comtipeenvriend.comvriendenvoordeel.comvriendenkorting.com
The domain will then look like this: [client].vriendenvoordeel.com.
However, if your referral campaign has a different name than the ones listed above, you can host these pages on a subdomain on your own website. That subdomain has to link to the domain on our side.
Our platform has no static IP and hence you will need to configure a CNAME in your DNS.
Add a CNAME record on a subdomain of your choosing that points to: {{client_name}}.membergetmember.co
See the screenshot below for an example of how Anderzorg configured their DNS to link tipeenvriend.anderzorg.nl to anderzorg.membergetmember.co.

$ dig tipeenvriend.anderzorg.nl CNAME

## Verify your DNS change by running the above command in your terminal
;; QUESTION SECTION:
;tipeenvriend.anderzorg.nl. IN  CNAME

;; ANSWER SECTION:
tipeenvriend.anderzorg.nl. 600  IN  CNAME anderzorg.membergetmember.co.
Payload
Payload
The payload of a callback may look like this:
{
  "sale_id": "SALE_ID",
  "email": "EMAIL",
  "api_key": "API_KEY",
  "name": "NAME",
  "bank_account": "BANK_ACCOUNT",
  "source": "SOURCE",
  "state": "STATE",
  "other": "OTHER",
  "...": "..."
}
Use the table below as a reference for which parameters should be included in the callbacks.
| Key | Value | Type | Description |
|---|---|---|---|
sale_id |
MGMco sale ID | (Required *) | A 24-character sale ID that you got from our system. This ID should be stored in your database. The ID is provided as a query parameter called mgmco_saleid. Read more… |
cookie_name |
Name of cookie that holds MGM sale ID | (Required *) | You may pass the sale_id directly, but if the sale_id is stored in a custom cookie and you use the ping script implementation, then you may pass the cookie_name parameter instead. The script will retrieve and post the stored sale ID. |
voucher |
MGMco voucher code | (Required **) | One of the voucher codes that you uploaded in the Campaign Manager. |
email |
Emailaddress buyer | Required | The emailaddress of the buyer. This is needed for communication and payout purposes. |
api_key |
API key | Required** | We’ll provide you with an API key. Without this key you won’t be able to update any sales. |
name |
Name buyer | Recommended | The name of the buyer. We will use this information to personalize communication. |
bank_account |
IBAN buyer | Recommended | The bankaccount of the buyer. This should be a valid IBAN. We will use this information to pay out the buyer reward once the sale completes. If you work with voucher rewards or pay out the reward yourself this is not needed. |
source |
Origin | Recommended | We use the following naming convention: {{client_name}}_backend_{{language}} (for example anderzorg_backend_nodejs). This information will help us in case troubleshooting is needed. |
state |
Sale state | Recommended | Accepts confirmed, completed, and aborted. If no state is provided, then the sale will confirm. It is recommended to provide a state to avoid misinterpretations. |
reason |
Reason for aborting | (Required) | In case of aborting a sale with a callback, you are required to provide a reason. |
other |
- | Optional | You may add any other relevant data. We will save this as metadata. Data like your own sale ID or customer ID has proven valuable for customer support employees and operational teams that perform sale validation. |
* Only sale_id or cookie_name is required, not both. cookie_name is only relevant when using front end tracking via our ping.js-script. NB: only use these keys if you have a cash reward.
** only use voucher if you have a voucher reward. If so, do not use sale_id or cookie_name
*** api_key is only relevant when using back end API tracking.
Intro
We provide a Campaign Manager including a dashboard with all the sales that have been done through your Referral Campaign. Our operations team will give you access to it. If your colleagues need to have access as well, please mail us with the full name and (business) email and we will take care of it.
How to log in?
- Once you have access, go to cm.membergetmember.co.
- Fill in your (business) email address to get a magic link.
- Check your inbox for your magic link that logs you in instantly. Please note this link is valid for 24 hours and can only be clicked once.
- Here you go, you are now logged into your own Referral Campaign Dashboard!
You’ll see an overview with all the sales done via your Referral Campaign. Depending on what kind of reward you use (Cash or vouchers), you can get different kinds of information from here by filtering the data. If you would like to look into one particular sale, i.e. for customer service, you can also search on email address of the Promoter or Referral.
Cash rewards
With Cash rewards you can filter on sale state (Status), whether the reward is paid out or not, and the time interval.
Status
You’ll see 4 kinds of sale states
- Initialized: this is created when the Referral clicked the Referral link and went to your Landing Page.
- Confirmed: there was a sale, but it’s still in the cooling off period
- Completed: this is a sale approved and valid to pay out the reward
- Aborted: a rejected sale that didn’t comply to the Terms and conditions of your campaign and is not valid to receive the reward.
Pay out
When you let MGMco handle the pay outs of the rewards, we will show you whether the reward has been paid or not. We only pay out when the sale reached ‘completed’ and when we have a bank account in our system. If you handle the pay outs yourself, we don’t register that and all sales will be marked as not paid. So then it’s up to you to keep track of this in your administration.
Time interval
If you would like to see all the sales from a specific period, simply filter by date.
Voucher rewards
Status
Submitted sales: a submitted sale means a voucher code has been assigned to a (potential) referral through the Referral Landing Widget, but hasn’t been used in a purchase yet. (Single Use vouchers only).
Completed sales: when a voucher code gets redeemed, we receive a callback and the sale will be set to completed. If the promoter reward is a code as well, this will be the moment he receives the email with his reward code. In case of Multi use vouchers, completed will be the only status you’ll see.
Pay out
In case of voucher codes we don’t pay out in cash, so all sales will be marked as not paid. You don’t need to worry because all Promoters will get their reward voucher code by email. If you handle the rewards (i.e. in form of a gift), it’s up to you to keep track of this in your administration.
Time interval
If you would like to see all the sales from a specific period, simply filter by date.
Sales export
This step is in particular handy if you need to do some sales matching or if you pay out the rewards yourself.
Sales matching
When the cooling off period is over, you need to check if the sale is valid to pay out the reward. You can export a list by filtering on ‘confirmed’ as status and the time interval based on when those sales were done (most likely 2-3 weeks before). Now simply click ‘export’ and you’ll get a .csv file containing all the buyer (Referral) info, promoter info and any other additional data you sent back in the callback, like customer_id, order number, etc.
Since it’s a .csv, you will need to separate the data to columns (text to columns, delimit by comma) and change the format of the date.
Now add two columns before the first column, one for ‘Y/N’ and one with ‘Abort reason’. In your own system cross check whether the Referral is still a customer and complied to all the right Terms and conditions. If so, in the first column put in a ‘Y’. If not, put in a ‘N’ with the reason why not in the second column. The reason of rejection is mandatory as it will help the customer service people do their job. That’s it! Work through the list. We recommend you to do this once a week.
Export for payments
If you handle the pay out of the reward yourself, you can export a list by filtering on ‘completed’ sales and the time interval based on when those sales were done (most likely 2-3 weeks before). Now simply click ‘export’ and you’ll get a .csv file containing all the buyer (Referral) info, promoter info and any other additional data you sent back in the callback, like customer_id, order number, etc.
Since it’s a .csv, you will need to separate the data to columns (text to columns, delimit by comma) and change the format of the date.
Sales import
This step is only needed when you want to change the status of multiple sales (a.k.a. sales matching).
Now you have your .csv files containing all the sales that are approved and can be paid out, it’s time to import them in our system.
- Go to the Campaign Manager and click ‘import’
- Upload the .csv file
- Check the boxes for ‘Y/N’, the aborted reason and the MGMco sale id* and select which column corresponds with what.
- On the top right, click on ‘import’ and check if anything is highlighted. If not, scroll down and click ‘Import’.
The import is succesful when you see the sales are all highlighted green. Please note the processing can take up to a few minutes after you clicked the button and you should refrain yourself from repeatedly clicking the button. You don’t want to spam your users with a dozen automated mails, right?
You’re all done and the rewards can be paid out!
*These three columns are mandatory
Troubleshooting
What if I can’t find that person?
If you can’t find a person based on their email, then there’s no sale or account in our system with him as the Promoter or Referral. There are several cases where this can happen:
- The Promoter heard of your Referral Campaign and recommended your brand to his friend in person. He never registered as a Promoter in your campaign, hence, there is no account or sale tied to him or the Referral.
- The Referral clicked the referral link, then went checking for a better deal and navigated to your website through several other affiliate links. This could especially be the case if you have one specific contract/product on your website for your Referral Campaign and the Referral chose another contract/product.
- The Promoter did bring in a referral, but the callback failed. Unfortunately it can happen that the tracking doesn’t work 100%. Especially when the Referral blocks cookies and all other sorts of tracking in his browser, we can’t register anything.
- The email contains a typo.
Our search system is case-sensitive, so if you can’t find the person right away, first check if there’s a capital letter or space somewhere. Still nothing? Check the time interval or substitute a part of the search query with an asterisk (*)
If the Promoter is certain he referred someone, we advise you to check your own CRM to see through which channel the said Referral came in. If it’s indeed due to a tracking problem, we can manually register the sale in our system (coulance).
To process a coulance case, send us (info@membergetmember.co or your contact at the MGMco operations team) an email containing the following info:
Promoter
- Name:
- Email:
- Bank account (in case of cash rewards):
Referral
- Name:
- Email:
- Bank account (in case of cash rewards):
- Amount: